Part 1: Cutting Out, Making, and Stitching
I promised this a week or so ago in response to a request on how to make a leather flask.There is more than one way to make one, but this is one of the ways I do my commercial ones.This tutorial will be in three parts. 1) Cutting out, marking and stitching. 2) Wetting and forming. 3) Hot wax dipping.The material I am using is 3mm veg tanned shoulder.I have made a template that you can print out for your own flasks, It's a PDF file Flask Template.

A piece of leather with the image from the template drawn on it. When you do these, draw round once then flip the template over before drawing the second one. That way, if there are any inconsistancies with symetry, both halves will still come together properly.

Then use a sharp knife to cut roughly round the two flask halves.

These are going to be sewn together, so I find the best way to keep them in register is to glue the edges.

I only glue about a quarter inch in. That won't make any difference when opening the flask up as the stitching will cover that anyway.

Both halves joined together. Be careful when joining them if you are using impact adhesive. Once contact is made, they won't come apart.

Now the edges are still rough. This is when I sand down the edges to get a nice smooth edge.


We need smooth edges, because we are going to cut some grooves where we will run the stitch wheel. The groover uses the edge of the leather as a guide, so the smoother the edge, the neater the groove will be.

Cutting the groove in the leather.


Here the grooves have ben cut, ready for the stitching wheel. The groove also allows the thread to sit below the surface of the flask. Not essential, but tidy.

Now before you can mark the leather with the stitching wheel, you need to soften it, so it takes an impression of the wheel. We do that by wetting it under runnng water.

We run the stitch wheel around the grooves. It looks good, but it's function really is to mark where the holes will go for stitching the two halves.

Here is the stitch wheel finished, ready to sew now once the leather has dried a bit.

This is what I'll be using to make the holes. It's a Dremmel copy with an extention shank and a tiny little model makers drill bit the same diameter as the needles.

Here's a close up.

The holes are drilled on a block of scrap wood, keeping the drill completely vertical so it goes through at 90°


Here is the flask with all the holes drilled.

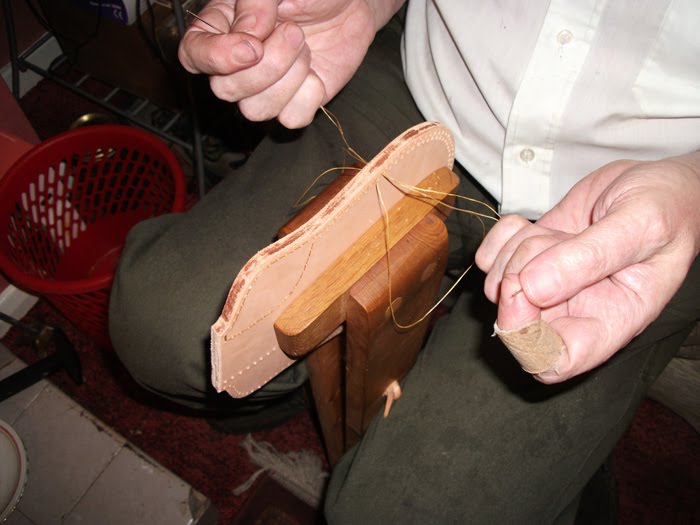
At this stage, I prepare to sew the two halves together. I am using a stitching clam between my knees to hold the work steady. This allows both hands free to do the stitching. I am using artificial sinew and what is known as the saddle stitch. The sinew is threaded onto two harness needles (blunts), one at each end.These are then passed through the same hole, but in opposite directions. Then they go through the next hole and so on, making figure eights all the way along. They are pulled tight after every stitch (or every couple of stitches once your arms get tired).


Hint: When preparing the artificial sinew, only use lengths long enough for your outstretched arms. You will need four lengths or so to complete the flask, but if you have one long length, you will spend ages pulling it through the holes and there is a likelyhood that it will get tangled (especially if using waxed linen thread).When you get near the end of a piece, back stitch four holes, then forward two - so you'll have 6 bits of sinew going through that last hole. Then just snip off flush. Don't worry about tying a knot, The packed sinew will keep it there and the hot waxing will seal it in later on.

Here's the flask all sewn up and ready to stuff with pearl barley to take it's shape.
Part two to follow shortly.